Tutorial in English
Tutorial in Italian
Editing Text on Your Squarespace Website Made Easy!
In this video, I walk you through the basics of editing text on your Squarespace website. You’ll learn how to update page titles, descriptions, buttons, and content blocks — all without needing any coding or design skills.
Editing text may seem simple, but it’s one of the most powerful tools you have for keeping your website clear, up to date, and client-focused. When your content reflects your current services and message, your site instantly becomes more professional and effective.
This tutorial is part of my mission to make website management less overwhelming and more empowering.
I’ve helped many freelancers, small businesses, and creatives take control of their sites without stress and you can do the same!
👉 Want more structured support? Download The Website Blueprint Kit here, my step-by-step PDF guide to planning your website with clarity and strategy.
👉 Or book a free 20-min consultation here to receive a special discount on the Kit
If you enjoyed this video, explore my other free trainings on web design, branding, and SEO. And don’t hesitate to reach out with questions — I’d love to hear from you!
Scroll down for the full step-by-step guide we covered in this video.

Enjoying the Training, but needing more Support?
Step-by-Step Guide - Editing Text on Your Squarespace
This guide walks you through the essentials of editing text in Squarespace. From page titles and descriptions to buttons and section content, you’ll see how easy it is to keep your website fresh, professional, and aligned with your business.
1. Navigate to Your Pages
From your Squarespace dashboard, go to Pages.
Pick the page you’d like to edit (for example, your Homepage).
Pro tip: Work on a copy of your site first if you want to practice without worrying about mistakes.
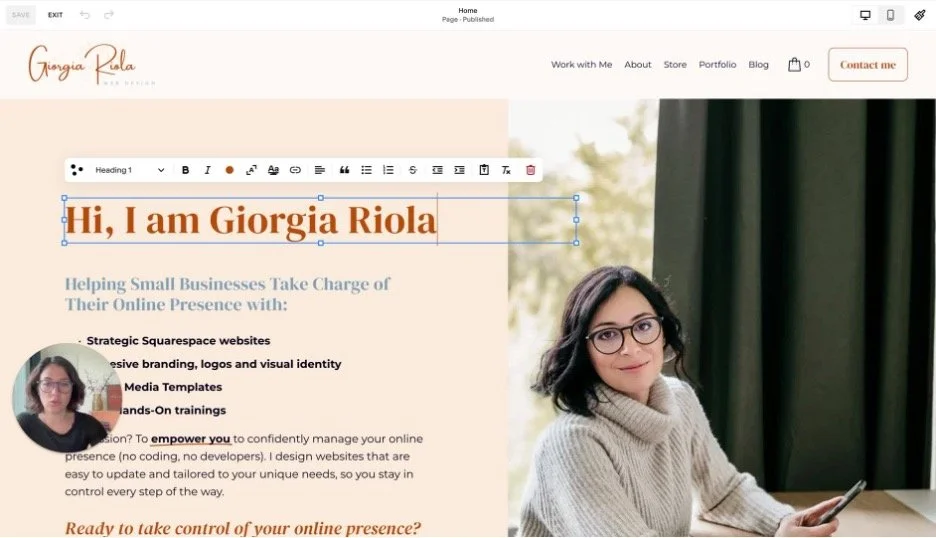
2. Edit Text Blocks Directly
Hover over the text you want to change.
Click inside the block and type your new content.
This works for most headings and paragraphs.
Quick win: Updating your content regularly keeps your site current and shows clients you’re active.
3. Update Buttons
For buttons, you’ll need to click the Edit icon (pencil) instead of typing directly.
You can also double-click to open the settings and change the button text.
Change the label text (what the button says).
Update the link so it points to the right page or section.
💡 Keep button text short and action-oriented → e.g. Book Now, Learn More, Get Started.
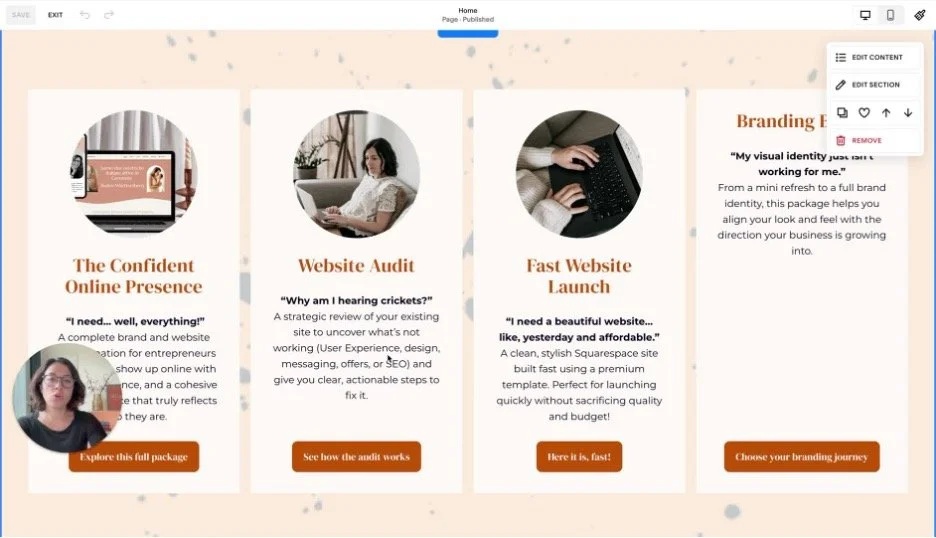
4. Edit Section Titles & Descriptions
Sometimes you can’t click directly into the text. No problem!
Look for Edit Content in the top-right of the section.
Open the content panel.
Update the title (the large heading) and the description (longer supporting text).
👉 This is especially common for “Reviews” or “Services” sections where text is structured in blocks.
5. Common Section Types
Here’s what you’ll see most often:
Title + description + button → each field is edited separately.
Item lists (like services or features) → go to Edit Content → Items and update each entry’s title + body text.
6. Don’t Forget to Save!
This is the most important step
After editing your text, click Save (bottom right).
If you keep working without saving, your changes won’t stick.
Make it a habit: edit → save → continue editing.
👉 Please, please, please don’t forget this step.
I’ve seen too many clients lose their updates because they got carried away!
7. Recap
Click directly into text blocks where possible.
Use the Edit icon for buttons.
Use the Edit Content panel for structured sections.
Always hit Save after making changes!
The more you update your text, the more your site reflects who you are right now… not who you were months ago.
Tips
Keep your text clear and client-focused → make it easy for visitors to know what you do and how you can help.
Do a quick text review every quarter to keep your site relevant.
Don’t stress: you can always undo or re-edit. Squarespace is flexible!
SAVE, SAVE, SAVE before leaving the page!
Need more help?
Contact me or consult the official Squarespace website